I am going to try something new on here! I've had the idea to do a tiara making tutorial for a while, and I've noticed that quite a lot of people flock to this blog searching for a tiara how-to. Well, this is my test post! Read below for instructions on making a tiara!

These are the basic supplies you'll need:
1 can silver, gold, bronze or other metallic or non-metallic spray paint color
1 bottle of Mod Podge
1 pair wirecutters
1-2 pairs needle-nosed or small-sized pliers you can use to bend the wire
14-16 gauge wire (use a wire that you can bend fairly easily, but is strong enough to keep it's shape
when handled gently)
18-20 gauge silver wire (found at any craft store for about $3)
Glue gun with one gluestick (optional)
Beads, pearls, rhinestones, or whatever else you want to put on your tiara, plus contact cement type glue or epoxy resin

1. Cut 30 inches of wire, and fold in half.

2. Make a loop where you folded the wire, and start twisting the wire around itself.

3. Make sure to keep the twist uniform. It helps if the wire ends are splayed out, like in the above picture, rather than as parallel pieces of wire.

4. When you get to the end, leave a little less than an inch of wire. Take one end and bend it into a loop. The wire I use is coated in a thin layer of oil, to keep it from rusting, hence my dirty hands!

5. Take the other end and wrap it around the base of the loop you just made, to help secure it. It helps to use two pairs of pliers at this step.

6. Now take your twisted wire and bend it into a headband/tiara shape. You should also make sure that the band fits your head right now. You can also readjust it later, when the tiara is finished.

The band is done!

7. Take another length of wire 20 inches in length and fold in half to find the middle.

8. Feel free to copy my design, but you can do your own thing here! The center point of my wire is the loop in the heart. I then start to bend the wire evenly on both sides to get as symmetrical a design as possible.

I just go with the flow, and bend it whatever way suits my fancy.

Now we have a finished symmetrical design for our tiara.

9. Cut 4 equal pieces of wire about 2 inches each. If you desire, you can use a thinner wire here, such as a 16 gauge copper or brass wire. I like to use the same thick gauge I use for the rest of the tiara because it makes for a lot more of a stable design that won't move around, but if you are not as experienced in wire work as I am, you will want to work with a thinner gauge.

10. Take each 2 inch piece of wire and attach the design to the frame.

You can attach the tiara to the frame in as many places as you like, but since this is a very simple design, attaching it in 4 places is sufficient.

I attached this particular design in between the heart and loops, and then on the last scrolling loops.

The tiara is now firmly attached to the frame!

11. Now to hide that ugly wire frame (well, it's also got some pokey sharp pieces that we want to protect your head from). Take a length of ribbon about 15 inches long and 1/2 wide. Ribbon color doesn't matter, as you will see below. Lace it through one of the loops at the ends of the frame.

Take the ribbon and wrap it around the end of the ribbon, and continue wrapping the ribbon around the tiara band.

You can then choose whether to loop the ribbon into the design, like I did above, or lace the ribbon underneath the design and wrap it just around the frame. When you reach the end of the tiara, hopefully you haven't run out ribbon! If you have, you may need to re-wrap the tiara, and not overlap the ribbon onto itself so much. Glue the end of the ribbon in place with a dab of hot glue, or if you don't have a hot glue gun, use a little bit of wire and secure the ribbon end in place.

12. Now that the tiara is built, we are going to paint it with Mod Podge. "Why?" you may ask. There are several reasons why I do this. One is that the wire I use rusts when it is around moisture, so the Mod Podge prevents this, and two is that the dried Mod Podge (it is both a glue and a protective varnish) will allow the spray paint to stick to the wire. Third, the ribbon is now completely glued down, and is a permanent resident of the tiara.
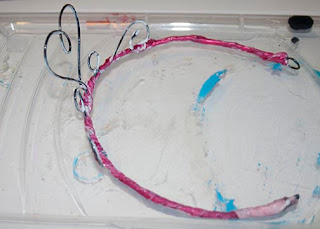
I dry my tiaras on a plastic storage container lid, since Mod Podge doesn't stick to it. Depending on how warm it is in your home or outside (if you choose to dry it outside), it will take between an hour and 3 hours to dry.

13. Now that the Mod Podge is dry, we are going to go outside and spray paint the tiara frame. Make sure to turn the tiara all around and get into every nook and cranny. One coat normally works when I use metallic spray paint, but feel free to put additional coats after waiting 15 minutes between each coat.

Allow the spray paint to completely dry, between 20 minutes and an hour.

The tiara is coming together!

14. Now we are on to the fun part! If you wanted to attach beads to the tiara, now is the time. Take your thin silver wire and cut into about 2 inch lengths. I used faux grey glass pearls on my tiara. Wire the beads onto the places where you want them.

I attached three large gray glass pearls to the tiara.

Then I decided I also wanted to add some rhinestones! I used high quality acrylic rhinestones. You don't want to use super glue to glue them onto the tiara frame, as super glue is very thin, and it also is damaging to plastics, and will mostly likely ruin your rhinestones. I use a type of glue called E6000, which is a contact cement. It is very thick, and remains flexible when dry. You can also use Epoxy Resin if you already have it, it is just thinner than contact cement and you will have to make sure the rhinestones don't slide around before the resin dries.

I used three medium-sized rhinestones to balance out the design.

The finished tiara! Not including drying times, this took less than an hour to make.
15. Enjoy wearing your new tiara!

These are the basic supplies you'll need:
1 can silver, gold, bronze or other metallic or non-metallic spray paint color
1 bottle of Mod Podge
1 pair wirecutters
1-2 pairs needle-nosed or small-sized pliers you can use to bend the wire
14-16 gauge wire (use a wire that you can bend fairly easily, but is strong enough to keep it's shape
when handled gently)
18-20 gauge silver wire (found at any craft store for about $3)
Glue gun with one gluestick (optional)
Beads, pearls, rhinestones, or whatever else you want to put on your tiara, plus contact cement type glue or epoxy resin

1. Cut 30 inches of wire, and fold in half.

2. Make a loop where you folded the wire, and start twisting the wire around itself.

3. Make sure to keep the twist uniform. It helps if the wire ends are splayed out, like in the above picture, rather than as parallel pieces of wire.

4. When you get to the end, leave a little less than an inch of wire. Take one end and bend it into a loop. The wire I use is coated in a thin layer of oil, to keep it from rusting, hence my dirty hands!

5. Take the other end and wrap it around the base of the loop you just made, to help secure it. It helps to use two pairs of pliers at this step.

6. Now take your twisted wire and bend it into a headband/tiara shape. You should also make sure that the band fits your head right now. You can also readjust it later, when the tiara is finished.

The band is done!

7. Take another length of wire 20 inches in length and fold in half to find the middle.

8. Feel free to copy my design, but you can do your own thing here! The center point of my wire is the loop in the heart. I then start to bend the wire evenly on both sides to get as symmetrical a design as possible.

I just go with the flow, and bend it whatever way suits my fancy.

Now we have a finished symmetrical design for our tiara.

9. Cut 4 equal pieces of wire about 2 inches each. If you desire, you can use a thinner wire here, such as a 16 gauge copper or brass wire. I like to use the same thick gauge I use for the rest of the tiara because it makes for a lot more of a stable design that won't move around, but if you are not as experienced in wire work as I am, you will want to work with a thinner gauge.

10. Take each 2 inch piece of wire and attach the design to the frame.

You can attach the tiara to the frame in as many places as you like, but since this is a very simple design, attaching it in 4 places is sufficient.

I attached this particular design in between the heart and loops, and then on the last scrolling loops.

The tiara is now firmly attached to the frame!

11. Now to hide that ugly wire frame (well, it's also got some pokey sharp pieces that we want to protect your head from). Take a length of ribbon about 15 inches long and 1/2 wide. Ribbon color doesn't matter, as you will see below. Lace it through one of the loops at the ends of the frame.

Take the ribbon and wrap it around the end of the ribbon, and continue wrapping the ribbon around the tiara band.

You can then choose whether to loop the ribbon into the design, like I did above, or lace the ribbon underneath the design and wrap it just around the frame. When you reach the end of the tiara, hopefully you haven't run out ribbon! If you have, you may need to re-wrap the tiara, and not overlap the ribbon onto itself so much. Glue the end of the ribbon in place with a dab of hot glue, or if you don't have a hot glue gun, use a little bit of wire and secure the ribbon end in place.

12. Now that the tiara is built, we are going to paint it with Mod Podge. "Why?" you may ask. There are several reasons why I do this. One is that the wire I use rusts when it is around moisture, so the Mod Podge prevents this, and two is that the dried Mod Podge (it is both a glue and a protective varnish) will allow the spray paint to stick to the wire. Third, the ribbon is now completely glued down, and is a permanent resident of the tiara.

I dry my tiaras on a plastic storage container lid, since Mod Podge doesn't stick to it. Depending on how warm it is in your home or outside (if you choose to dry it outside), it will take between an hour and 3 hours to dry.

13. Now that the Mod Podge is dry, we are going to go outside and spray paint the tiara frame. Make sure to turn the tiara all around and get into every nook and cranny. One coat normally works when I use metallic spray paint, but feel free to put additional coats after waiting 15 minutes between each coat.

Allow the spray paint to completely dry, between 20 minutes and an hour.

The tiara is coming together!

14. Now we are on to the fun part! If you wanted to attach beads to the tiara, now is the time. Take your thin silver wire and cut into about 2 inch lengths. I used faux grey glass pearls on my tiara. Wire the beads onto the places where you want them.

I attached three large gray glass pearls to the tiara.

Then I decided I also wanted to add some rhinestones! I used high quality acrylic rhinestones. You don't want to use super glue to glue them onto the tiara frame, as super glue is very thin, and it also is damaging to plastics, and will mostly likely ruin your rhinestones. I use a type of glue called E6000, which is a contact cement. It is very thick, and remains flexible when dry. You can also use Epoxy Resin if you already have it, it is just thinner than contact cement and you will have to make sure the rhinestones don't slide around before the resin dries.

I used three medium-sized rhinestones to balance out the design.

The finished tiara! Not including drying times, this took less than an hour to make.
 |
| If you want to purchase this tiara, visit my Etsy shop! |
15. Enjoy wearing your new tiara!